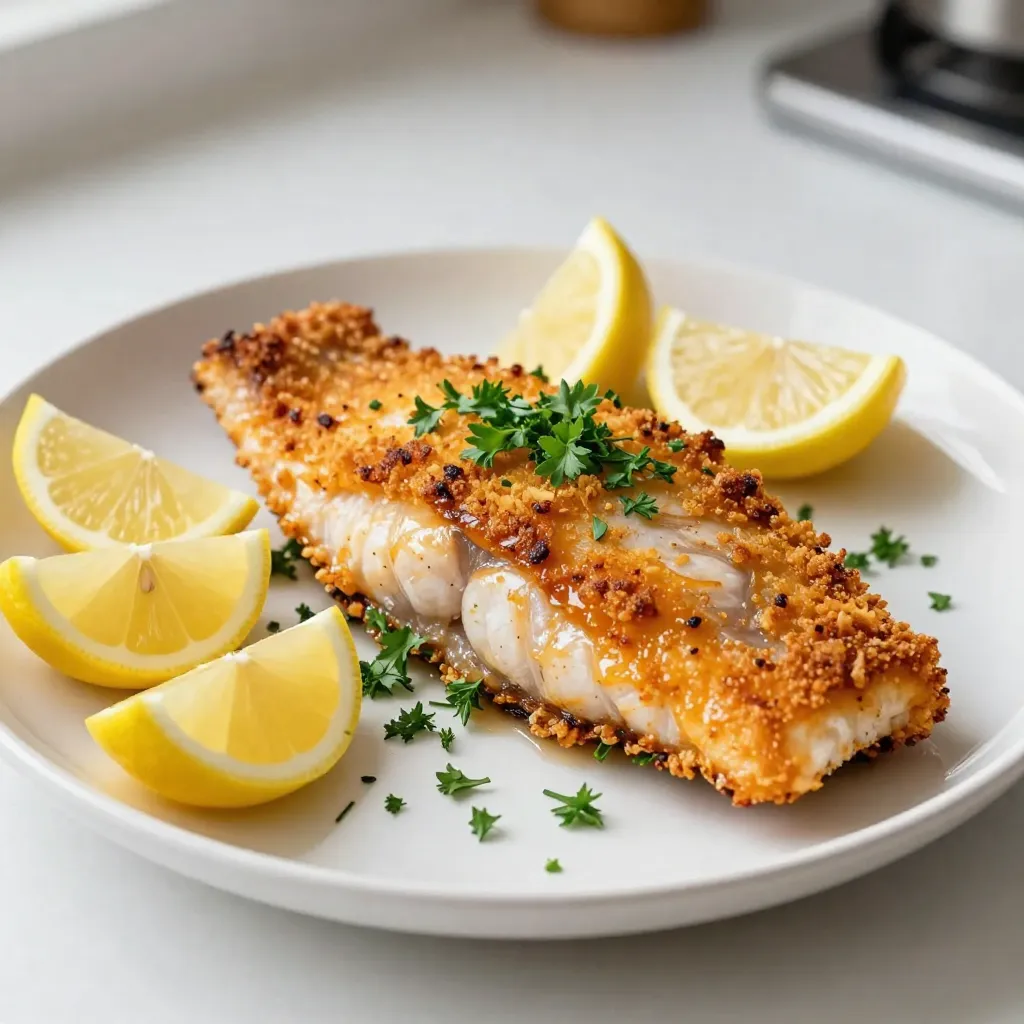
If you’re searching for a quick, tasty dinner, look no further than my Parmesan Crusted Tilapia! This dish combines crispy, savory flavors with tender fish for an appealing meal. With just a few ingredients like tilapia, Parmesan cheese, and panko breadcrumbs, you’ll create a dish that impresses. Whether you’re a seasoned cook or just starting, this easy recipe is sure to please everyone at the table. Let’s dive in!
Why I Love This Recipe
- Delicious Flavor Combination: The crispy Parmesan crust adds a savory depth to the mild tilapia, making each bite incredibly satisfying.
- Quick and Easy: This recipe comes together in just 30 minutes, perfect for a weeknight dinner without sacrificing flavor.
- Healthy Option: Tilapia is a lean fish, and pairing it with a light crust keeps this dish healthy yet indulgent.
- Versatile Serving: Serve it with lemon wedges or over a bed of greens, making it a versatile dish for any occasion.
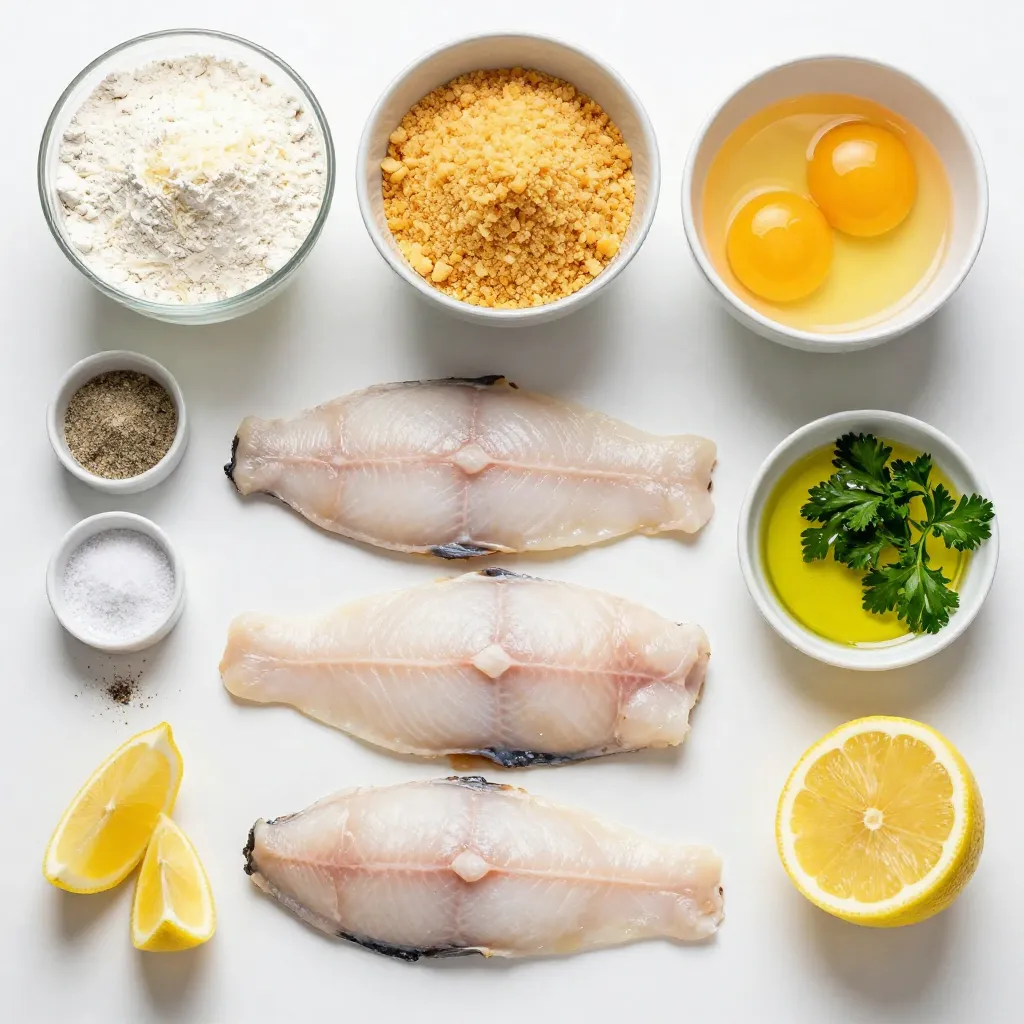
Ingredients
Main Ingredients
– 4 tilapia fillets
– 1 cup freshly grated Parmesan cheese
– 1 cup panko breadcrumbs
Additional Seasonings
– 1 teaspoon garlic powder
– 1 teaspoon onion powder
– 1/2 teaspoon salt
– 1/2 teaspoon freshly ground black pepper
Cooking Essentials
– 3 tablespoons extra virgin olive oil
– 2 tablespoons all-purpose flour
– 2 large eggs, beaten
When you prepare Parmesan crusted tilapia, the ingredients help create a simple yet tasty meal. The tilapia fillets are the star of the dish. They provide a mild flavor that works well with the crunchy topping. Freshly grated Parmesan cheese adds a salty, nutty taste. Panko breadcrumbs give a great crunch to the crust.
The seasonings like garlic and onion powder enhance the flavor without overwhelming the fish. Salt and pepper add a nice touch, balancing all the tastes.
For cooking, you need olive oil to fry the fish. It gives a rich flavor and helps achieve a golden crust. The all-purpose flour helps the egg stick to the fish. Beaten eggs coat the fillets, allowing the breadcrumbs to adhere perfectly.
With these ingredients, you set yourself up for a delicious dish that impresses everyone at the table.
Step-by-Step Instructions
Preparing the Dredging Stations
1. Setting up the bowls: Start by gathering three shallow bowls. Place them in a row. In the first bowl, add 2 tablespoons of all-purpose flour. This will help the coating stick.
2. Mixing breadcrumb coating: In the third bowl, mix together 1 cup of freshly grated Parmesan cheese, 1 cup of panko breadcrumbs, 1 teaspoon of garlic powder, 1 teaspoon of onion powder, 1/2 teaspoon of salt, and 1/2 teaspoon of black pepper. Stir this well to blend all the flavors.
Coating the Tilapia
1. Flour coating process: Take a tilapia fillet and dip it in the flour. Make sure to shake off any excess flour. You want a light coat, not a thick one.
2. Egg dipping technique: Next, dip the floured fillet into the beaten eggs. This will help the breadcrumbs stick to the fish. Let any extra egg drip back into the bowl.
3. Applying the breadcrumb mixture: Press the fillet into the breadcrumb mix. Make sure both sides are coated well. Repeat this process for all four fillets.
Cooking the Fillets
1. Heating the oil properly: Pour 3 tablespoons of extra virgin olive oil into a large skillet. Heat it over medium-high heat. To check if the oil is ready, flick a small amount of water into the pan. If it sizzles, you are good to go.
2. Frying instructions: Gently place the coated tilapia fillets into the hot oil. Avoid overcrowding the skillet. Fry them for about 3-4 minutes on each side. You want the crust to turn a nice golden brown.
3. Recognizing when the fish is done: The fish will flake easily with a fork when it is cooked. If needed, fry in batches to ensure even cooking.
Enjoy your flavorful Parmesan crusted tilapia!
Tips & Tricks
Getting the Perfect Crust
To get the best crust, press the tilapia well into the coating. This helps the cheese and breadcrumbs stick. When you fry the fish, avoid putting too many fillets in the pan at once. Fry in small batches. This keeps the oil hot and gives you a crispy crust.
Serving Suggestions
Pair your tilapia with fresh lemon wedges for a zesty kick. A simple salad or steamed veggies work great as sides. You can also serve it with rice or quinoa for a filling meal. Try adding a side of garlic bread to soak up the delicious juices.
Enhancing Flavor
You can boost flavor with fresh herbs like dill or basil. A sprinkle of paprika can add a nice touch, too. For toppings, think about a light drizzle of balsamic glaze or a creamy tartar sauce. These options can take your tilapia to the next level.
Pro Tips
- Use Fresh Ingredients: Freshly grated Parmesan cheese and high-quality panko breadcrumbs will elevate the flavor and texture of your crispy crust.
- Don’t Skip the Flour: Coating the fish in flour before the egg helps the breadcrumbs adhere better, ensuring a perfect crispy finish.
- Maintain Oil Temperature: Keep an eye on the oil temperature while frying; too hot will burn the crust, while too cool will make it soggy.
- Rest After Frying: Let the cooked fillets rest on a paper towel-lined plate for a minute before serving to absorb any excess oil and maintain crispiness.
Variations
Alternative Fish Options
You can easily swap tilapia for other white fish. Cod, haddock, or sole work well too. Just remember to adjust cooking times slightly. Thicker fish might need a bit more time. Thin fillets cook faster, so stay alert.
Gluten-Free Option
To make this dish gluten-free, use gluten-free breadcrumbs. These will give you a nice crunch. You can also skip all-purpose flour and use cornstarch instead. This keeps the coating light and crispy.
Flavor Customizations
Feel free to get creative with spices. Adding paprika or cayenne can give a nice kick. You can also mix in different cheeses, like mozzarella or cheddar. Each choice brings a different twist to the flavor.
Storage Info
Storing Leftovers
To keep your leftovers fresh, place them in an airtight container. This helps prevent the fish from drying out. Make sure to refrigerate them within two hours after cooking. For best taste, eat the leftovers within two days. If you need to keep them longer, freezing is a great option.
– Best practices for refrigeration: Use a shallow container to cool the fish quickly. Cover it well to keep moisture in.
– Tips for freezing: Wrap individual fillets in plastic wrap. Then, place them in a freezer bag. Label the bag with the date.
Reheating Instructions
When reheating, you want to keep that crispy crust. The best method is to use an oven or an air fryer. These methods help regain the crunchiness lost in the fridge.
– Best methods to retain crispiness: Preheat your oven to 375°F (190°C). Place the fish on a baking sheet. Bake for about 10 minutes or until warm.
– Avoiding soggy tilapia: Avoid microwaving, as it makes the fish soggy. If you must use a microwave, do so for only a few seconds.
Shelf Life
Parmesan crusted tilapia stays fresh for a limited time. Knowing how long it lasts is key to enjoying it at its best.
– How long does Parmesan crusted tilapia last?: In the fridge, it lasts about 2 days. In the freezer, it can last up to 3 months.
– Signs of spoilage: Look for a strong fishy smell or a slimy texture. If you see any discoloration, it’s best to throw it away.
FAQs
Can I use frozen tilapia?
Yes, you can use frozen tilapia. Just remember to thaw it first. To thaw, place the fish in the fridge overnight. If you’re short on time, you can seal the fillets in a bag and place them in cold water for about an hour. This will help the tilapia thaw safely and quickly.
What to serve with Parmesan crusted tilapia?
Parmesan crusted tilapia pairs well with many sides. Here are some great options:
– Steamed broccoli
– Garlic mashed potatoes
– Rice pilaf
– Fresh garden salad
– Roasted asparagus
These sides balance the flavors and add color to your plate.
How to make the crust extra crispy?
To achieve an extra crispy crust, follow these tips:
– Use panko breadcrumbs; they are lighter and flakier than regular breadcrumbs.
– Press the fillets into the breadcrumb mixture firmly. This helps the coating stick better.
– Fry in batches. Overcrowding the pan can lower the oil’s temperature, making the crust soggy.
– Ensure the oil is hot before adding the fish. A good test is to sprinkle a drop of water in the oil; it should sizzle.
Can I bake instead of fry?
Yes, you can bake the tilapia for a healthier option. Here’s how:
1. Preheat your oven to 425°F (220°C).
2. Place the coated fillets on a baking sheet lined with parchment paper.
3. Spray the fillets lightly with cooking spray or drizzle with olive oil.
4. Bake for 12-15 minutes, or until the fish is cooked through and the crust is golden brown.
This method keeps the fish moist while still giving you a nice crust.
In this post, you learned to make Parmesan crusted tilapia. We covered key ingredients and step-by-step instructions. I shared tips for achieving a perfect crust and suggested serving ideas. You can also customize flavors or use different types of fish. Store leftovers properly to keep them fresh.
Cooking can be fun and rewarding. I encourage you to try making this dish. Enjoy every bit